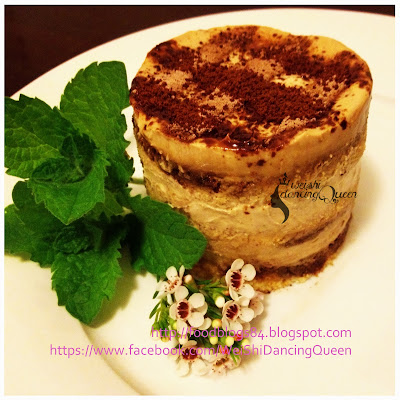
由傳統貌似布丁、濕漉漉、以杯子器皿承載 。。。 以至現今較為普遍,蛋糕形態,意大利女生,也能掌握自如,好讓她們的男人,也願意《 帶她一起走 》 (^O^)
Recipe In both English and
Chinese
喜歡這篇食譜,歡迎按 Share 和 Like,與友好即時分享 ◉‿◉
喜歡這篇食譜,歡迎按 Share 和 Like,與友好即時分享 ◉‿◉
身為咖啡迷的我,今天沒有起用傳統的 ladyfingers (Savoiardi) 版本,因為喜歡海綿餡,口感鬆軟細膩, 除了 Tiramisù 親密伙伴 Kahlua 之外,特別加入 Amaretto ,令這件 Tiramisù 添加一份杏仁香氣、層次更豐富,想試試吧?
詳盡食譜, 與您一起分享!
Serves 4
Sponge:
3 (egg yolks)
5 tbsp (castor sugar)
2 (egg whites)
6 tbsp (cake flour)
2 tbsp (cornstarch)
Pinch salt
Mascarpone Filling:
1 (egg yolks)
2 tbsp (castor sugar)
10 tbsp (mascarpone cheese)
6 tbsp (double cream)
Espresso mixture:
4 tbsp (espresso coffee)
2 tbsp (Amaretto)
2 tbsp (Kahlua)
Coffee powder and Cocoa powder for dusting
Mint
Sponge :
Preheat oven to 175°C,cream the egg yolks and sugar together, whisking until doubled in volume. Whip the egg whites to a stiff peak. Gently fold in the egg yolk mixture. Sift the dry ingredients together and gently fold in. Line a baking tray with baking paper and spread the mixture out evenly to a thin layer. Bake for 8 to 10 minutes or until it still moist and lightly brown in colour.
Once baked, divide into 4 equal portions.
Mascarpone Filling :
Mix the espresso, amaretto and Kahlua together and set aside. For the filling, whisk the egg yolks and sugar together over a double boiler until tripled in volume and thickened. Remove from the heat and cool to room temperature. Whisk the mascarpone, double cream and 2 tablespoons of the espresso mixture together until smooth and then blend into the egg mixture until smooth.
Begin layering the Sponge and Mascarpone filling together. Start with a layer of sponge. Using a pastry brush, generously brush the sponge with the espresso mixture. Spread an even layer of mascarpone filling and repeat the process ending with a layer of mascarpone filling on the top. Chill the tiramisu for 2 hours. Use a ring cutter or a small knife to cut the tiramisu into circles, or any shape desired. Use coffee powder and cocoa powder to decorate the top. Enjoy !
份量: 4人
海綿餡:
3 (蛋黃)
5 湯匙 (幼砂糖)
2 (蛋清)
6 湯匙 (低筋面粉)
2 湯匙 (玉米澱粉)
少許 鹽
乳酪餡:
1 (蛋黃)
2 湯匙 (幼砂糖)
10 湯匙 (Mascarpone 乳酪)
6 湯匙 (奶油)
濃縮咖啡醬料:
4 湯匙(濃縮咖啡)
2 湯匙 (Amaretto)
2 湯匙 (Kahlua)
咖啡粉
可可粉
薄荷葉
海綿餡:
蛋黃及糖一起攪拌,直到體積增加了一倍。
以高速將蛋清打至僵硬企身,加入蛋黃混合物,輕輕地折疊在一起。
粉類過篩拌勻,與以上的混合物輕輕折疊一起,烤盤上放置烤紙,把完成後的海綿餡,均勻塗抹一層薄薄的。
預熱烤箱至攝氏175度,烤 8 到 10 分鐘,或直到它仍然潮濕,並帶有淺棕色。
烤成,分成 4 等份。
乳酪餡:
混合咖啡、 酒類在一起,備用。
將蛋黃和糖一起放置雙鍋爐,打至體積增加 3倍厚,靜候冷卻至室溫。
乳酪、 奶油和 2湯匙的咖啡酒混合物,放在一起拌勻至光滑,然後加入雞蛋混合液,至光滑。
海綿餡和乳酪餡,以階層式組合在一起。最底下一層海綿餡,使用糕餅的畫筆,抹上咖啡酒混合物,隨即放置一層乳酪餡。
重複以上過程三次,最後一層是乳酪餡。
冷凍 2小時,以小刀或蛋糕模,切割成所需形狀,以咖啡粉、可可粉、薄荷葉裝飾頂部,即可享用!
Copyright © 2013 愛 ✿ 廚樂食譜 foodblogs84.blogspot.com.au 版權所有 All Rights Reserved
(◠‿◠) 想與我一起分享更多更詳盡的飲食資訊、生活點滴、私房菜食譜、海外遊蹤,請瀏覽以下網站 ..........
面書: https://www.facebook.com/WeiShiDancingQueen
食博: http://foodblogs84.blogspot.com.au


沒有留言:
發佈留言